In case you’re keen on studying a sturdy, environment friendly, and scalable enterprise-level server-side framework, you’ve landed on the correct weblog 🚀! We’ll begin with a fast introduction, and on this submit and those to comply with, we’ll dive straight into the sensible half. Collectively, we’ll construct an utility that covers numerous Nest JS basic and superior subjects, similar to Companies, Controllers, Modules, Repository, Pipes, Dependency Injection, and database connectivity utilizing TypeORM. To make issues extra attention-grabbing, we’ll deploy this utility utilizing top-notch instruments (trace: Vercel or StackBlitz) and put it to the check with the highly effective Postman instrument.
What is going to we construct? take a sneak peak: deployed model of my app
All through this collection anticipate clear diagram-based explanations, useful GitHub Gists code snippets, and full entry to the supply code of the app we’re crafting. Let’s take a more in-depth look and actually perceive the Nest JS!
Beginning with fast overview:
Nest was created by Kamil Mysliwiec. It has greater than 62.5 thousand GitHub stars ⭐(taken on 30 Jan 2024) nonetheless rising.

Nest JS is a Angular impressed server-side Node JS backend framework, Constructed on prime of Typescript, Open-source platform, After we say Platform meaning it comes with lot of instruments out of the field like Dependency Injection, Micro companies, Net socket, Testing utilities and Helps REST and GraphQL API out of the field.
At this time it’s utilized by prime corporations like Adidas, Pink Hat, GitLab, Mercedes-Benz, IBM, Capgemini and many others. of their manufacturing.
Let’s take a more in-depth overlook of NestJS:
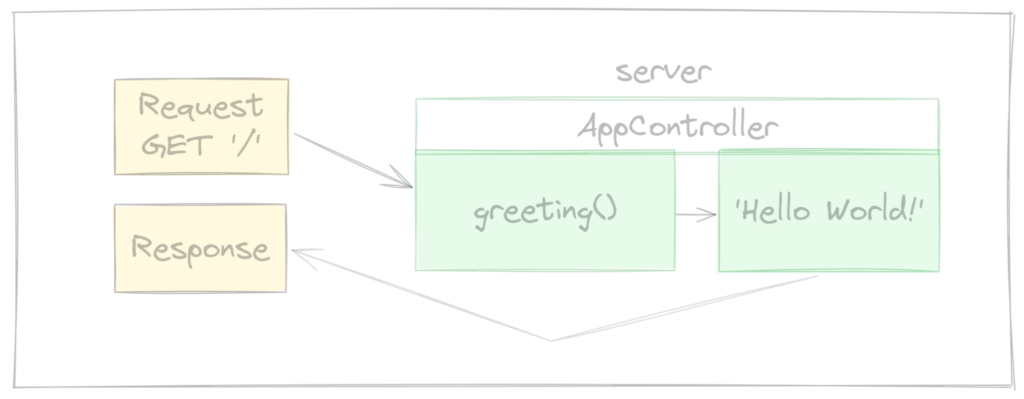
Nest JS is a backend framework. After I say backend one factor immediately comes into thoughts is HTTP Request/Response. Lets perceive the way it works with the assistance of the diagram under.
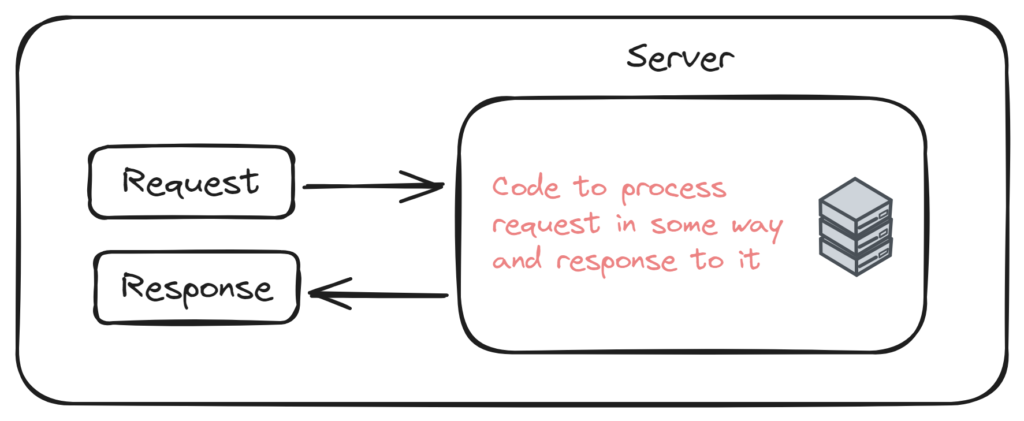
Fig. Shopper/Server Structure
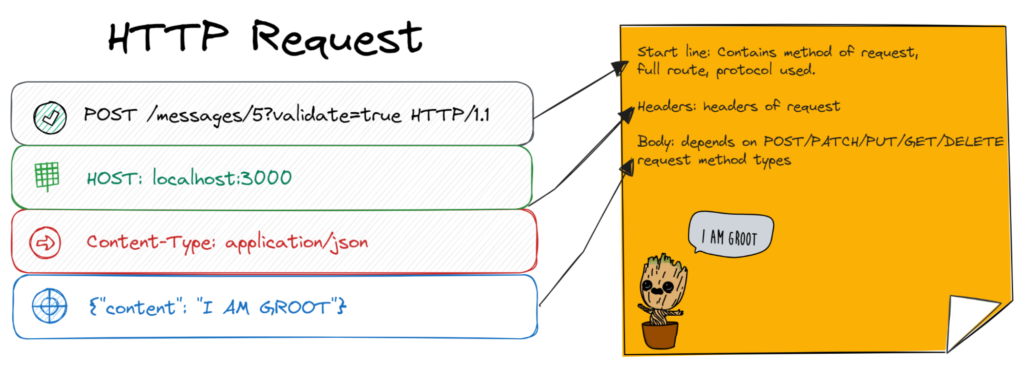
Fig. HTTP request
How HTTP request works
Each HTTP server you ever going to create might have a Request/Response cycle.
Customers are going to request to your server, contained in the server you’ll have some quantity of code that can course of that request. You would possibly validate information contained in the request and finally you would possibly formulate the response and ship it again to whoever made that request.
Everytime you construct the server, the request and response cycle will likely be virtually the identical and it’s not differ no matter any Framework, Library, Language or Platform.
Under is extra detailed breakdown of above Shopper/Server structure diagram:
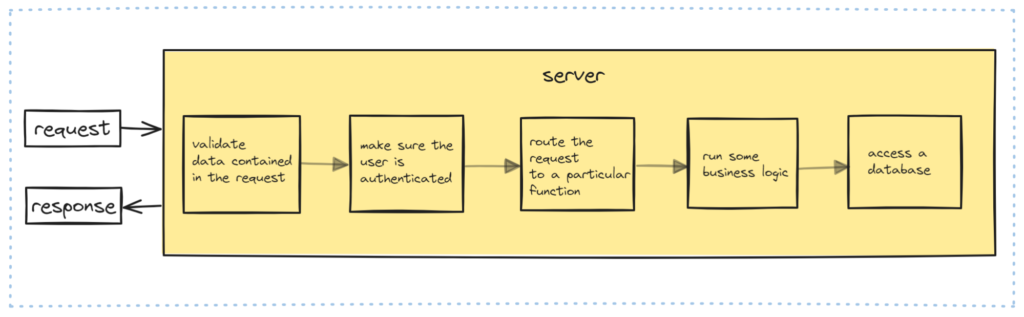 Fig. Shopper/Server Structure detailed
- Obtain a request
- Would possibly do some Validation on the info that comprises within the request (validate some information within the physique of request)
- Be certain that the consumer is Authenticated/Authorize to ship us a request
- Route or Level the request to specific operate to deal with a request which may consequence to
- Working a specific Enterprise logic and finally
- Entry or Retailer information inside a database.
Then on account of the above total course of we’re going to formulate a response and ship it again to whoever made that request.
Possibly in some instances we would not do authentication or exclude among the steps however roughly the method goes to be the identical.
Let’s perceive above clarification in NestJS means:
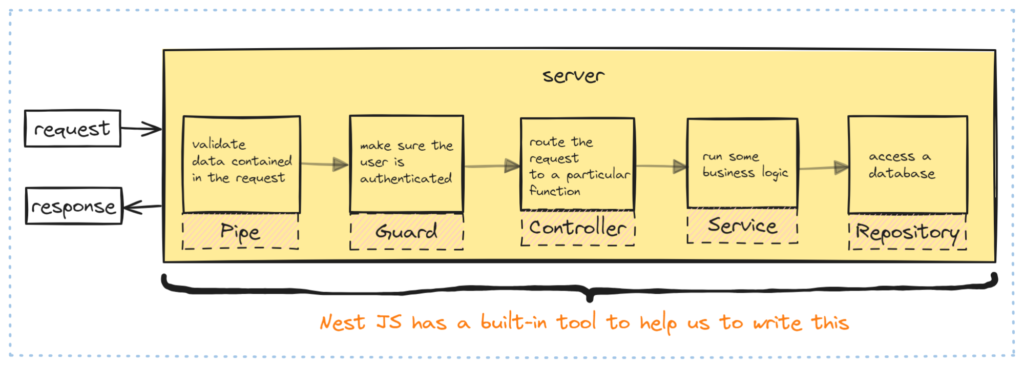 Fig. Nest JS Shopper/Server Structure
In Nest JS we have now particular instruments to deal with every step.
Pipes: Helps to validate information of incoming requests.
Guard: Be certain that the consumer who’s making requests to the applying is authenticated/approved.
Controllers: Routing logic.
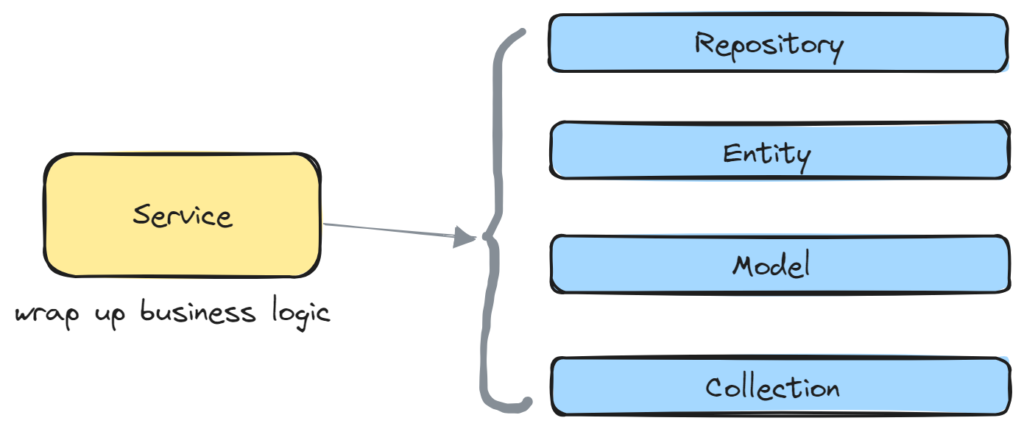
Service: Deal with information entry and enterprise logic.
Repository: Handles information shops in db.
Constructing Blocks of Nest JS: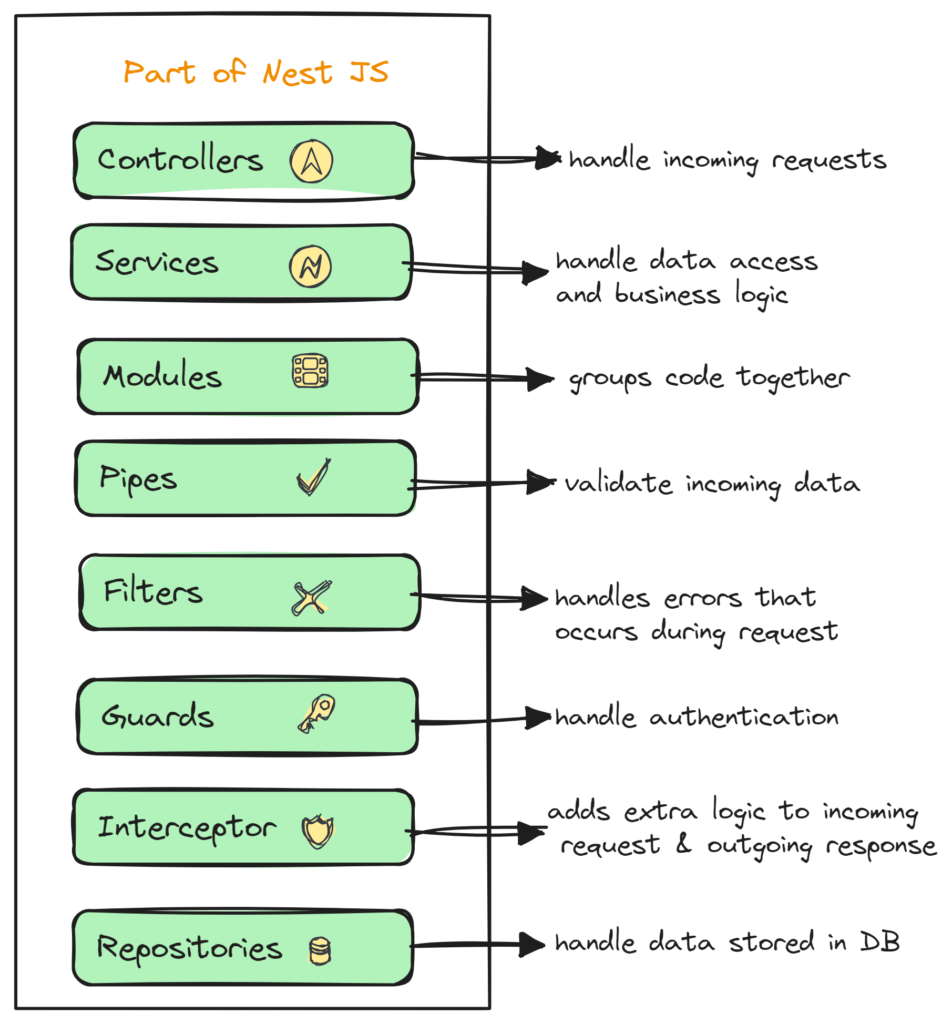
Fig. Elements of Nest JS
Fast overview to folder construction and a few necessary recordsdata:
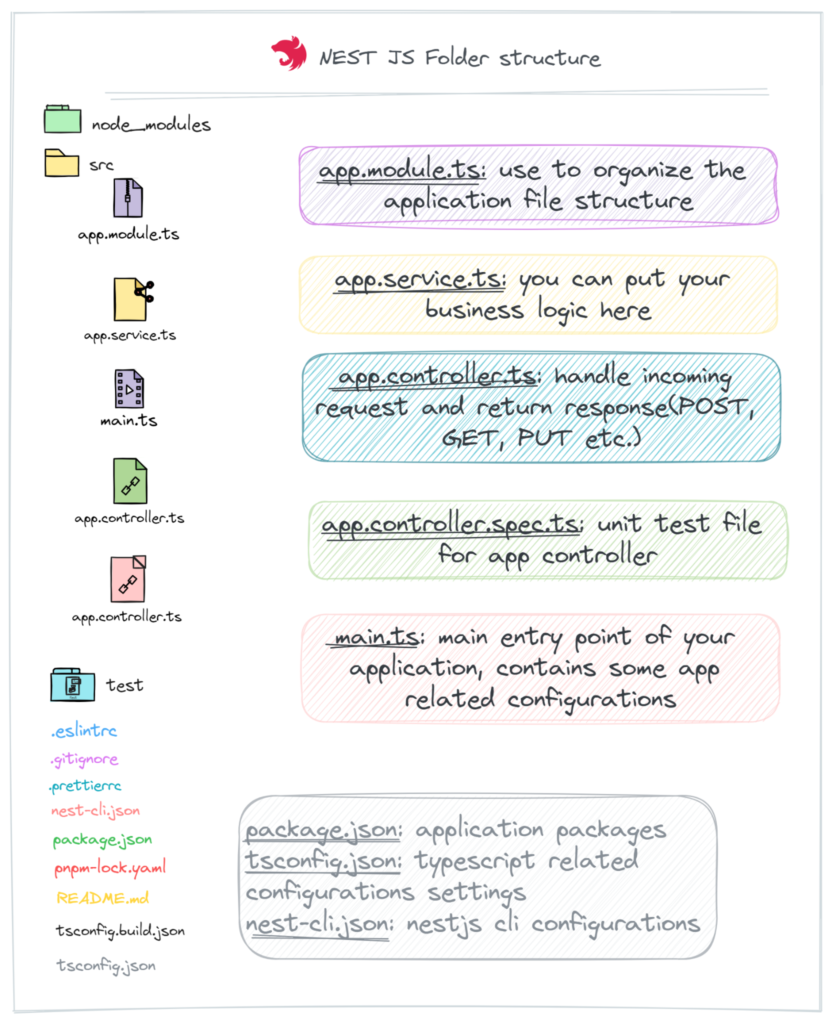 Fig. Nest JS folder construction
Modules: Because the identify suggests it’s used to arrange code break up options into logical, reusable items, each Nest utility has at the least one root module, It’s used to bootstrap our utility similar as Angular framework(click on right here to examine Angular bootstraping)
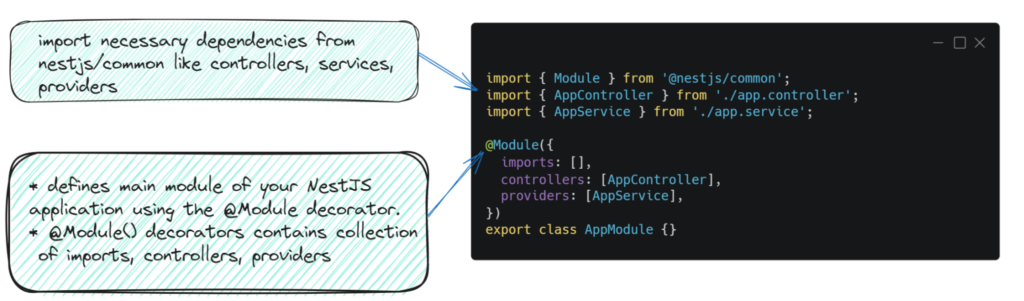
Fig. app.module.ts
Module Components:
- Controllers: Entry level of request, dealing with incoming request of utility and responding reply to the shoppers
- Imports: Checklist of modules which come beneath the modules.
- Suppliers: Instruction for Dependency injection system on the right way to get hold of a price for dependency
- Exports: Public API for module(explicitly export – important diff between Angular and NestJS)
Be aware: Dependency Injection – Essential idea to grasp in Nest JS and different present frameworks, I’m planning to elucidate this idea in upcoming blogs… keep tuned.
important.ts: Entry level of utility
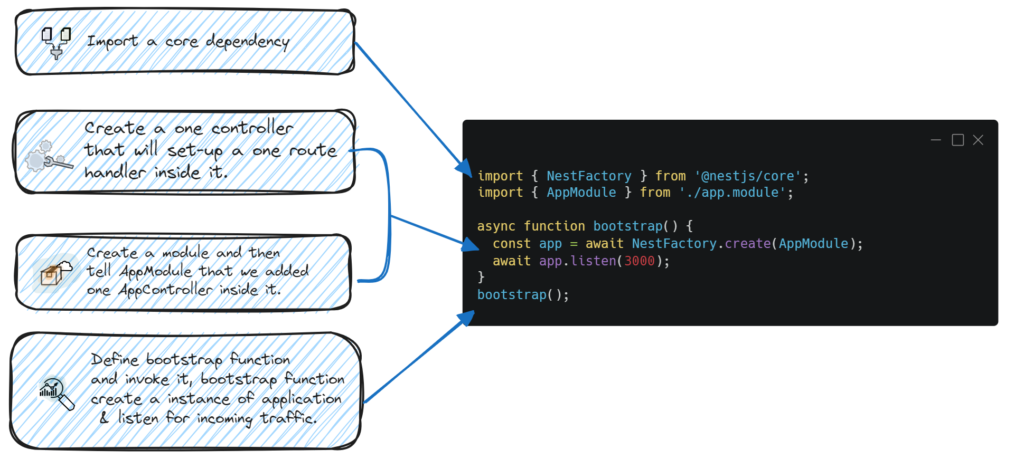 Fig. Elements of Nest JS
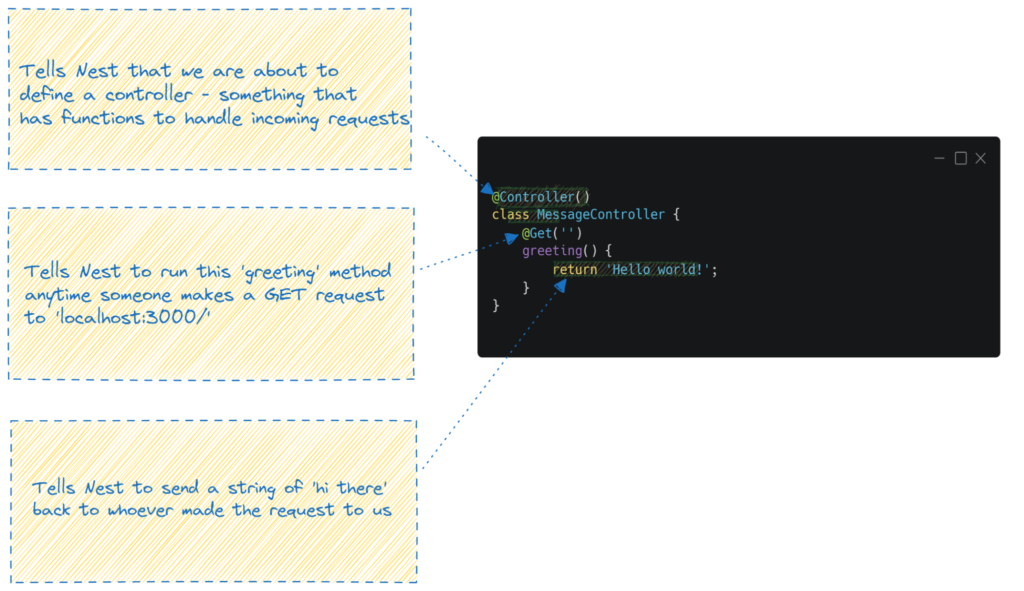
Controller: Every controller has multiple route and every route serve totally different actions like Create Replace, Delete
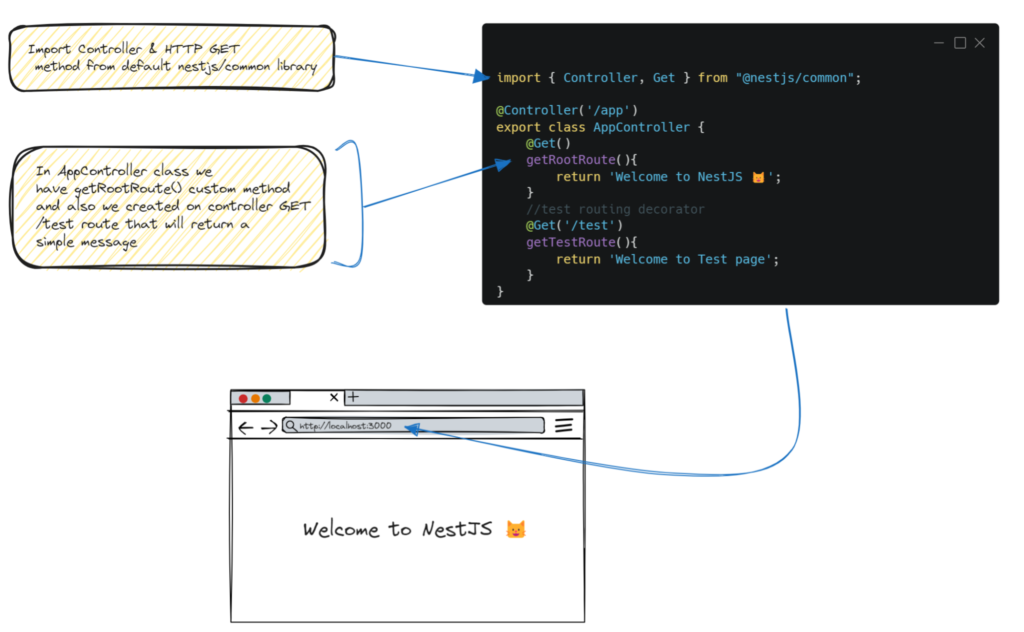
Fig. app.controller.ts
Decorators and its varieties:
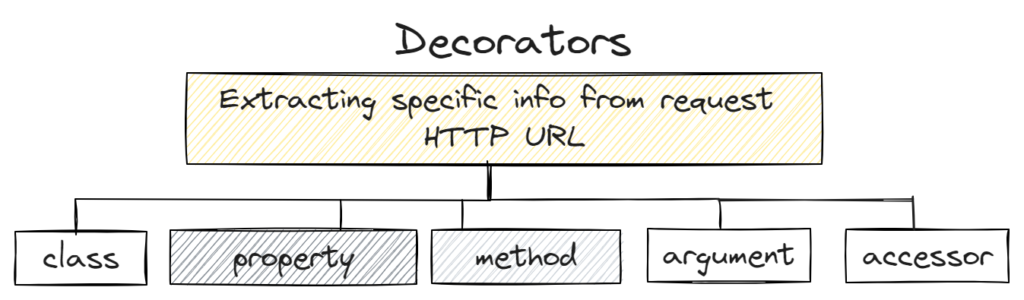
Fig. Kinds of Decorators
service.ts:
Now lets scaffold our first Nest JS app with official Nest CLI instrument:
Prerequisite: Newest Node JS model
Set up: To scaffold the undertaking lets set up Nest CLI
> npm i -g @nestjs/cli
> nest new project-name
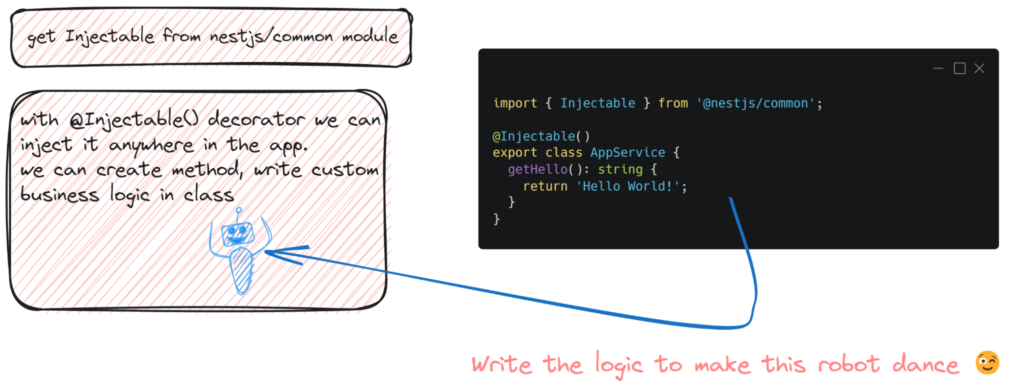
Let’s add some customized code in app.service.ts file right here we have already got getHello()operate that returns Good day World! String as mentioned earlier on this file we’ll add all our logics right here.
Be aware: copy code adjustments from right here
greeting(): string {
  return 'Welcome to NestJS 😺';
}
In above code we added greeting methodology that’s returning string message In app.controller.ts lets add one customized controller endpoint /howdy
@Get('/howdy')
  greeting(): string {
  return this.appService.greeting();
}
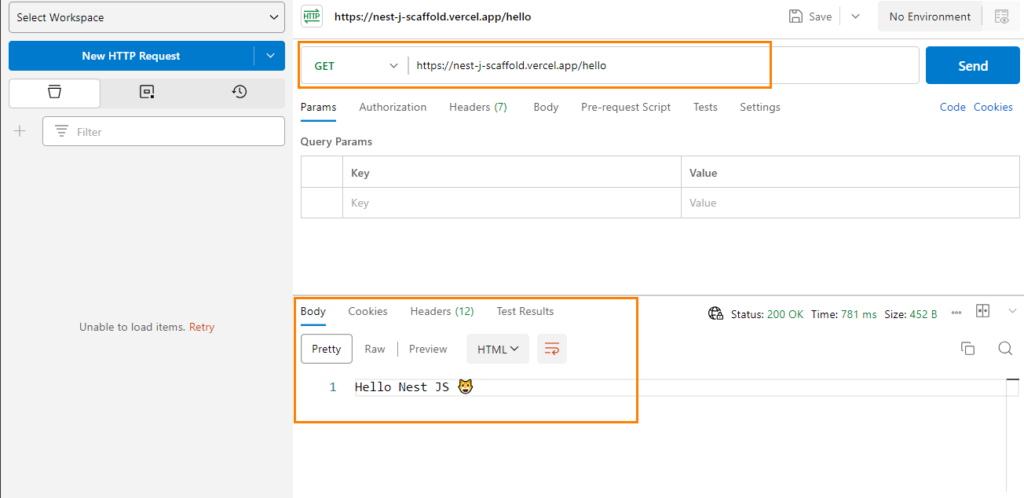
Further Ideas: To deploy your undertaking with any instrument like Vercel, Heroku, I have already got an in depth step-by-step information for deploying your Nest JS app with Vercel click on right here to comply with.
See my deployed demo right here(Deployed on Vercel): https://nest-j-scaffold.vercel.app/howdy
Postman request check: https://nest-j-scaffold.vercel.app/howdy